Smart Redirections
Smart Redirections automatically handle URL differences between WordPress and Shopify, preserving your SEO rankings and ensuring visitors always find your content.
Why Redirections Matter
When you sync content from WordPress to Shopify, URLs change:
WordPress URL:
https://yourblog.com/2024/01/15/ultimate-guide-to-skincare/

Shopify URL:
https://yourstore.com/blogs/news/ultimate-guide-to-skincare
Without redirections:
- Old links return 404 errors
- Search engine rankings are lost
- Bookmarks break
- Backlinks become worthless
How Smart Redirections Work
Automatic Detection
Wash: Blog Manager automatically detects:
- Original WordPress URL - Stored during sync
- New Shopify URL - Generated after article creation
- URL differences - Compared to determine redirect needs
Redirect Types
| Type | Code | Use Case |
|---|---|---|
| Permanent | 301 | Content moved permanently |
| Temporary | 302 | Content temporarily redirected |
| Canonical | - | SEO signal, no redirect |
Default: 301 permanent redirects (best for SEO)
Redirect Flow
flowchart TD
    A[User/Search Engine] --> B[WordPress URL]
    B --> C[Redirect Check]
    C --> D[301 Redirect]
    D --> E[Shopify URL]

    B -.- B1["/blog/post-title"]
    C -.- C1["Wash: Blog Manager Rules"]
    E -.- E1["/blogs/news/post-title"]
Enabling Smart Redirections
Step 1: Enable in WordPress Plugin
- Go to Wash: Blog Manager > Settings
- Find the Redirections section
- Toggle Enable Smart Redirections to On
- Configure redirect type (301 recommended)
- Save settings
Step 2: Configure Redirect Handling
Choose where redirects are processed:
Option A: WordPress Handles Redirects
- Redirects processed by your WordPress server
- Best if WordPress stays online
- No Shopify app changes needed
Option B: Shopify Handles Redirects
- Redirects stored in Shopify URL Redirects
- Works even if WordPress goes offline
- Requires Shopify Plus for bulk redirects
Option C: Hybrid Approach
- WordPress handles initially
- Export to Shopify after migration complete
Step 3: Verify Redirects
- Visit an old WordPress URL
- Confirm redirect to Shopify URL
- Check HTTP response code (should be 301)
Configuration Options
Global Settings
| Setting | Description | Default |
|---|---|---|
| Enable redirections | Turn feature on/off | Off |
| Redirect type | 301, 302, or canonical | 301 |
| Handle location | WordPress or Shopify | WordPress |
| Include archives | Redirect category archives | Yes |
| Preserve query strings | Keep URL parameters | Yes |
Per-Article Settings
Override global settings for specific articles:
Post: "Ultimate Guide to Skincare"
├── WordPress URL: /2024/01/ultimate-guide/
├── Shopify URL: /blogs/guides/ultimate-guide/
├── Redirect enabled: ✓
└── Redirect type: 301
URL Pattern Rules
Create rules for URL transformation:
Pattern Rules:
┌────────────────────────────────────────────┐
│ Rule 1: Date-based to clean URLs           │
│ From: /YYYY/MM/DD/{slug}/                  │
│ To: /blogs/{blog}/{slug}                   │
├────────────────────────────────────────────┤
│ Rule 2: Category prefix                    │
│ From: /category/{cat}/{slug}/              │
│ To: /blogs/{cat}/{slug}                    │
├────────────────────────────────────────────┤
│ Rule 3: Remove "blog" prefix               │
│ From: /blog/{slug}/                        │
│ To: /blogs/news/{slug}                     │
└────────────────────────────────────────────┘
Managing Redirects
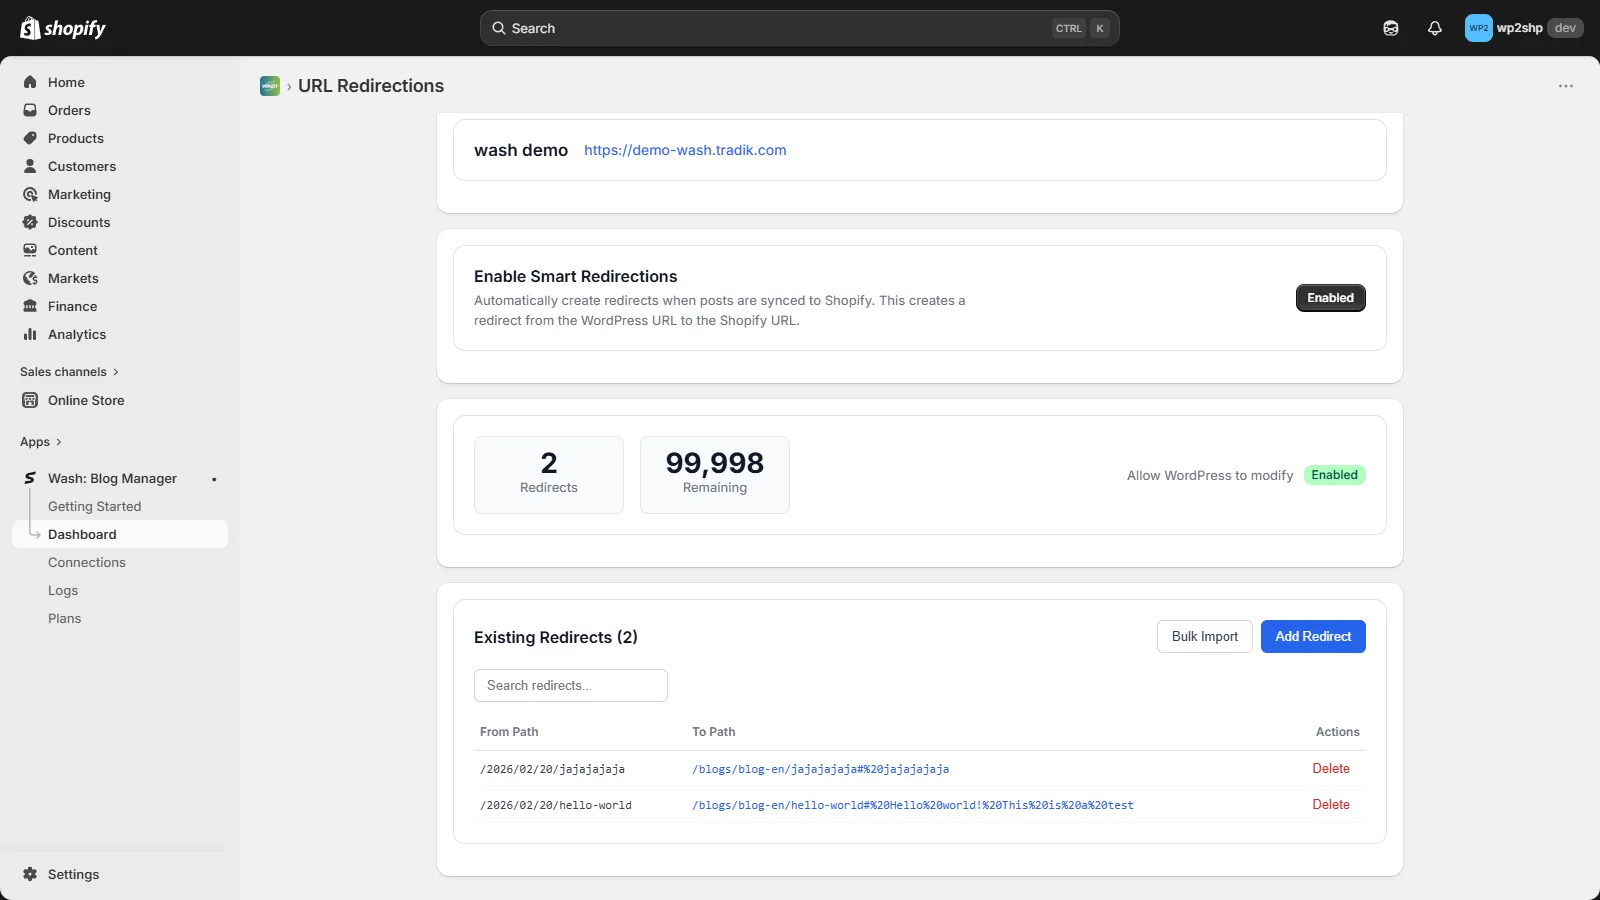
View Active Redirects
- Go to Wash: Blog Manager > Redirections
- See list of all active redirects
- Filter by status, date, or article
Redirect Dashboard
┌──────────────────────────────────────────────────────────┐
│ Smart Redirections Dashboard                              │
├──────────────────────────────────────────────────────────┤
│ Total Redirects: 156                                      │
│ Active: 152 │ Paused: 4 │ Errors: 0                      │
├──────────────────────────────────────────────────────────┤
│ From URL              │ To URL              │ Status     │
│ /2024/01/post-1/     │ /blogs/news/post-1  │ ✓ Active   │
│ /2024/01/post-2/     │ /blogs/news/post-2  │ ✓ Active   │
│ /category/news/      │ /blogs/news         │ ⏸ Paused   │
└──────────────────────────────────────────────────────────┘
Edit Redirect
- Click on a redirect entry
- Modify source or destination URL
- Change redirect type
- Enable/disable redirect
- Save changes
Delete Redirect
- Select redirect(s)
- Click Delete
- Confirm deletion
Warning: Deleting redirects may cause 404 errors for old URLs.
Bulk Operations
- Import redirects: CSV upload
- Export redirects: Download as CSV
- Bulk enable/disable: Select multiple
- Sync to Shopify: Push to Shopify URL Redirects
Advanced Features
Redirect Chains
Wash: Blog Manager detects and optimizes redirect chains:
flowchart LR
    subgraph Before["Before optimization"]
        A1[URL A] --> B1[URL B] --> C1[URL C] --> D1[URL D]
    end
    subgraph After["After optimization"]
        A2[URL A] --> D2[URL D]
        B2[URL B] --> D2
        C2[URL C] --> D2
    end
Regex Redirects
For complex patterns, use regex rules:
Pattern: ^/blog/(\d{4})/(\d{2})/(.+)/$
Target: /blogs/news/$3
Example: /blog/2024/01/my-post/ → /blogs/news/my-post
404 Monitoring
Track failed redirect attempts:
- Go to Wash: Blog Manager > Redirections > 404 Log
- View URLs that returned 404
- Create redirects for common 404s
Redirect Analytics
Track redirect usage:
| Metric | Description |
|---|---|
| Total hits | Number of redirect requests |
| Unique visitors | Distinct users redirected |
| Referrers | Where traffic came from |
| User agents | Bots vs humans |
SEO Considerations
Best Practices
- Use 301 redirects - Signals permanent move to search engines
- Redirect promptly - Set up before or immediately after migration
- Maintain redirects long-term - Keep for 1+ years minimum
- Avoid chains - Direct redirects are better for SEO
- Update internal links - Point to new URLs when possible
Search Engine Communication
When you enable Smart Redirections:
flowchart TD
    A["1. Bot requests /old-url/"] --> B["2. Server responds: 301 Moved Permanently"]
    B --> C["3. Location header: /blogs/news/new-url"]
    C --> D["4. Bot updates index"]
    D --> E["5. Rankings transfer to new URL"]
Google Search Console
After migration:
- Submit new sitemap
- Use URL Inspection tool
- Monitor Coverage report
- Check for crawl errors
Troubleshooting
Redirect Not Working
Check:
- Feature enabled in settings
- Redirect entry exists
- Source URL matches exactly
- WordPress is accessible (if handling redirects)
Redirect Loop
Symptoms: Browser shows "too many redirects"
Fix:
- Go to Wash: Blog Manager > Redirections
- Find conflicting rules
- Remove or modify duplicate entries
404 Instead of Redirect
Check:
- Redirect is active (not paused)
- URL slug matches exactly
- No typos in configuration
Performance Issues
If redirects are slow:
- Check server response times
- Consider moving redirects to Shopify
- Optimize redirect rules (avoid regex if possible)
Shopify Redirect Limits
Understanding Shopify's redirect limitations helps you plan your migration effectively.
Limits and Constraints
| Constraint | Limit | Notes |
|---|---|---|
| Maximum Redirects | 100,000 per store | All Shopify plans |
| Path Format | Relative paths only | Domain not included |
| Query Strings | Ignored | ?param=value stripped from matching |
| Wildcards | Not supported | Each URL must be individual |
No Wildcard Support
Shopify does not support wildcard redirects like /blog/* → /blogs/news/*. Each URL must be redirected individually.
Example:
# NOT supported in Shopify:
/blog/* → /blogs/news/*

# Must create individual redirects:
/blog/post-1/ → /blogs/news/post-1
/blog/post-2/ → /blogs/news/post-2
/blog/post-3/ → /blogs/news/post-3
Workaround: Use apps like "Bulk Redirect" for pattern-based redirects, or use Wash: Blog Manager's automatic redirect generation.
Bulk Import via CSV
Shopify allows bulk redirect import:
- Go to Shopify Admin → Settings → Navigation → URL Redirects
- Click Import
- Upload CSV file with two columns:
Redirect from(relative path)Redirect to(relative path)
CSV Format Example:
Redirect from,Redirect to
/blog/old-post/,/blogs/news/old-post
/category/news/,/blogs/news
/2024/01/my-article/,/blogs/news/my-article
Processing Time
- Small imports (< 1,000): Usually instant
- Large imports (1,000 - 10,000): May take several minutes
- Very large imports (> 10,000): Can take 15-30 minutes
Redirects become active immediately after processing completes.
If You Need More Than 100,000
If your migration requires more than 100,000 redirects:
- Prioritize: Focus on high-traffic URLs first
- Consolidate: Use category-level redirects where possible
- Third-party apps: Consider redirect apps with higher limits
- CDN rules: Use Cloudflare or similar for edge redirects
Migration Workflow
Complete Migration Steps
- Before sync: Enable Smart Redirections
- Sync content: All posts to Shopify
- Verify redirects: Test sample URLs
- Update DNS: Point domain to Shopify (optional)
- Monitor: Check analytics for 404s
- Maintain: Keep redirects active long-term
Keeping WordPress Alive
If keeping WordPress for content management:
Public: yourstore.com (Shopify)
Hidden: blog.yourstore.com (WordPress)
Redirects: blog.yourstore.com/* → yourstore.com/blogs/*
See Best Practices for detailed recommendations.